
Maybe you’ve just entered the wonderful world of retro gaming and only own a modern TV – or, you’ve just upgraded your TV from 1995 (that was so close to becoming a family heirloom) to a modern, whiz-bang flat screen television. Either way, you might be wondering how to plug your favourite consoles from “the day” into it.
These days, everything plugs in via HDMI ports. This digital, high-definition plug supports both video and audio and is plug and play in every sense of the term. We are currently in the 8th generation of consoles – however, only this and the seventh output to HDMI. This article will take you through how to plug in consoles from the first six generations (starting all the way back in the 1970’s) into modern TV’s. HDMI isn’t a choice for obvious reasons, but regardless, using the required video and audio inputs are more straightforward than you might think!
Types of Plugs
Coax/RF:

Examples of Use: Atari 2600, Magnavox Odyssey, Sega Master System
HDMI wasn’t the first type of plug to combine both video and audio. Long before that, there were coax plugs (also known as RF) which you might recognise today as the plug that is used for antennas. Consoles from the 70’s and 80’s used these exclusively since older televisions didn’t include any other inputs besides from the antenna plug.
Even though a console that uses coax might predate your TV by three decades, they’re still compatible. With my Atari 2600 Jr, for example, a lead I can use has an RCA plug on one end (that goes into the console) and a coax on the other. I simply plug the coax into my TV’s antenna socket and then scan for channels. It acts in much the same way an antenna as it is ‘broadcasting’ the console’s video and audio to a ‘channel’. Although, there is one key bit of information to consider: you’ll need to tune on the analogue TV setting, not digital. Analogue TV is turned off in most places around the world. However, most modern TV’s still support it anyway so just make sure you’re in the right part of your TV’s menus.
Other consoles from the era use what is known as an RF switch box. These work in much the same way as the cable described above, although might look a bit confusing the first time you see one. They are simple in use, though, as they simply allow both an antenna cable (for television) and the console to share the same socket on the TV. One of the cables sticking out plugs into the console, the other plugs into the TV’s antenna socket and there is a socket built-in where the actual antenna cable goes. Some will switch between the two automatically while others include a physical switch.
It should be noted that there are a few consoles out there that support both coax and composite (next section). Examples include the NES, the N64 and even the original PlayStation. Even though you don’t need to be a genius to get your head around RF, composite is much preferred because of its higher output quality and ease of use.
Composite:

Examples of Use: PlayStation 1, N64, SNES, Sega Genesis, Nintendo Wii
Composite comprises of three coloured RCA jacks (sometimes referred to as phono jacks) that combined, produce analogue standard definition video and stereo sound. While the jacks are completely the same internally, they are colour coded to ensure they are plugged into the right sockets on either end. The yellow plug is the video signal, while the red and white are a channel of audio each for stereo sound.
By far the most commonly used set of plugs in retro consoles, they plug into the corresponding coloured sockets on the TV (that might be labelled as “AV”). There is no need to tune in this feed of video and audio like coax either, as each set of composite on your TV will have its own dedicated channel. These are usually named AV1, AV2 etc. depending on how many your TV has.
However, a lot of modern TV’s do not include composite jacks built-in to save space (since they’re not so commonly used anymore). And while there are TV’s out there that don’t support composite whatsoever (if this is a problem of yours, read the heading below, “Converting Signal”) most actually do via an adapter. This usually has a 3.5mm jack on one side that plugs into the TV (or some other proprietary plug) with RCA sockets on the other for composite (they also sometimes support component). The TV should come with this adapter – but if it is missing, you’ll likely have to buy one from the manufacturer or online. Since every TV basically uses its own adapter, it’s unlikely that you’ll find a universal solution from brick and mortar stores.
A quick side note about composite: most VCR’s plug in by composite but also include coax inputs and outputs to allow recording of TV. These can be used to plug in coax only consoles (as described above) and then the VCR can be plugged in by composite. This is a simple method of converting from coax to composite as there doesn’t seem to be an easy way to do it otherwise.
Component:

Examples of Use: PS2, Xbox, GameCube
While very similar looking to composite since both use RCA jacks, component is actually capable of a high definition output. It also uses five jacks instead of three; the red, green and blue combine for the video signal, while there is usually another red and white for stereo audio. Just like with composite, most modern TV’s still support component although it may be for use through a supplied adapter only.
Since it supports a high-quality video output (that the retro community usually refers to as RGB) if the option is available, it’s the obvious choice. However, the cables can be trickier to obtain compared to component. The GameCube’s component cable, for instance, is quite rare and expensive since only the first model of the console supported it. Luckily for PS2, Xbox and Wii users, though, aftermarket versions are readily available and affordable online.
Honourable Mentions
SCART:

More common in Europe than anywhere else, SCART is usually used instead of composite (and can easily adapt to it). However, since it has a bucketload of pins it can also support RGB.
VGA:

While a few consoles can adapt to VGA, the only console to officially support it was the Sega Dreamcast. If plugged into a VGA enabled monitor with the relevant adapter, VGA compatible games could be displayed in 480p which surpasses the otherwise low-level composite. There was an official adapter released but there are plenty of aftermarket solutions out there. A lot of newer TV’s do include a VGA port, although I’d recommend checking before putting down the cash for the adapter since it’s not 100% common.
S-Video:
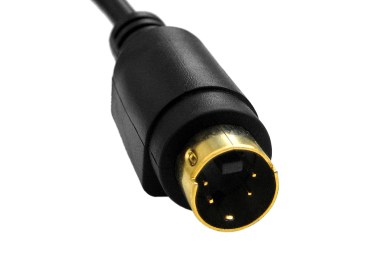
S-Video is another cable that typically replaces the yellow jack of composite in some parts of the world, although it is technically capable of a better picture since it outputs two signals instead of one. Regardless, adapters to convert from that to the yellow composite jack are cheap and easy to obtain if composite is your only option.
A Word on Aspect Ratio
Notice how older, tube-based TV’s have more of a square shape while modern flat screens are a rectangle? That’s because of the difference in what’s known as the aspect ratio. Older consoles used a 4:3 aspect ratio that suited the elder TV’s, but since flat screens use a widescreen 16:9 aspect ratio, the image might appear warped. Luckily, most modern TV’s allow you to manually change the aspect ratio – check the video settings. On my Sony Bravia, there is even a dedicated button on the remote.
Converting Signal
What if your TV doesn’t support composite or component, or you simply don’t want to deal with coax? Luckily, there are solutions. As mentioned before, coax-only consoles can be tuned into VCR’s which can then be plugged into composite. But if you’re handy with a soldering iron, most can be modded instead. For example, here’s a video I made about modding a Sega Master System to have a composite output.
Otherwise, composite and component can quite easily be converted to the more common HDMI. You are converting the signal, mind – not adapting, so conversion boxes are required that usually need their own power source. These can be found cheap enough online these days, but be weary that cheaper models can create a delay and thus input lag.
The be all and end all is a device called the XRGB-Mini Framemeister, manufactured by a company called Micomsoft. This offers very close to a lag-free video conversion, although you pay for that privilege since it sells for over $400, and sadly, was recently discontinued. Why this is the case is unknown, but it’s comforting to know that a lag-free conversion is at least possible as TV’s begin to shred video inputs of the 80’s and 90’s.


You must be logged in to post a comment.